
7.14.2010
We've moved!
Hello all! Darby O'Shea has moved on to prettier pastures! Find us (as always) by typing www.darbyoshea.com or by going to www.darbyoshea.wordpress.com. There you'll find new RSS links and an email subscription option!
7.07.2010
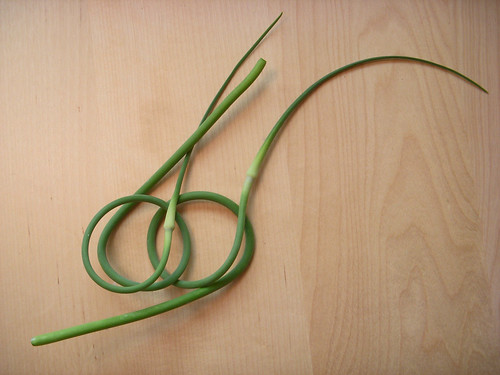
Late to the party: Garlic Scape Pesto
Hey there. It's Ms. Late to the Party telling you to do That Thing Everyone Else Was Already Doing Anyway.
 But seriously, on the off chance that one of my fair readers hasn't heard of garlic scapes yet (despite their recent media saturation), go forth and find some! They're just going out of season now (in New England) but if you can still find some at the markets, they're quite surprising and delicious!
What to do with them: apparently you can use them anytime you would normally use a green onion, or you can saute them like asparagus, throw them in a stir fry (this would be delish), or just eat them in a salad. The most popular choice, though: make pesto.
Here's what I did:
I roughly chopped the scapes and threw them into the food processor. Then I threw in a hunk of pecorino romano and a few leaves of basil (not many). Then I processed until that was all looking sort of chunky and happy. Then I slowly poured in olive oil until I liked the consistency. (I used a half pound of scapes, probably a quarter pound of cheese, and a half cup or so of olive oil. But I didn't measure and neither should you.) This pesto is delicious over pasta and I think it would be be a nice topping for some roasted chicken (or fish, maybe?) and it's tasty spread on bread.
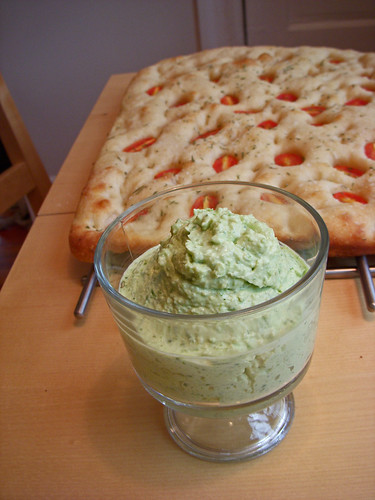 I also had some leftover homemade ricotta, so, after I filled an ice cube tray with the fresh pesto, I left a half cup or so in the food processor bowl and dumped in about a half cup of ricotta and buzzed it up. This made a delicious, creamy, immensely spreadable cheesy garlicky deliciousness. Slathered on fresh focaccia (with grape tomato halves nestled in) it was exceptionally delicious.
Also, if you didn't notice, I mentioned freezing this stuff. It's a good idea and you should try it. This stuff will keep for a while if frozen and if you squish it into icecube trays, you have the perfect dose for a bowl of pasta.
What to do with them: apparently you can use them anytime you would normally use a green onion, or you can saute them like asparagus, throw them in a stir fry (this would be delish), or just eat them in a salad. The most popular choice, though: make pesto.
Here's what I did:
I roughly chopped the scapes and threw them into the food processor. Then I threw in a hunk of pecorino romano and a few leaves of basil (not many). Then I processed until that was all looking sort of chunky and happy. Then I slowly poured in olive oil until I liked the consistency. (I used a half pound of scapes, probably a quarter pound of cheese, and a half cup or so of olive oil. But I didn't measure and neither should you.) This pesto is delicious over pasta and I think it would be be a nice topping for some roasted chicken (or fish, maybe?) and it's tasty spread on bread.
Also, if you didn't notice, I mentioned freezing this stuff. It's a good idea and you should try it. This stuff will keep for a while if frozen and if you squish it into icecube trays, you have the perfect dose for a bowl of pasta.
7.01.2010
New camera!


Oh, and your food tip of the day: throw some golden raspberries on top of some yogurt and drizzle with local honey. Then thank me.
6.30.2010
Faber: The Secretary - a collaboration
In which the talented Mr. takes a photo of mine and writes a bit of story to go with it. This week’s post is part of a larger story, previous chapters of which you can read here and here. Faber is in Germany investigating the final years in the life of Charles D. Thornton, an American ex-pat detective author.
He moved slowly along the cobbled street. The scrap of paper in his satchel bore an address printed in the Poet‘s neat handwriting, an address that Faber had been hoping to uncover since his arrival in Germany.
The small apartment was situated in the so-called Karoviertel of Hamburg and occupied the third floor of a large square cement building on Falkenstrasse. It was the last known residence of Helga Schnatterer, Thornton’s private secretary for nearly twenty years and the only living person to have spent any significant time with the ex-pat writer during his final years in Berlin.
 Brown paint accented the windows of every building on the street, the identical and finely adorned houses speaking to the difference between Berlin and Hamburg. The latter, a uniformly prosperous north German city, seemed to Faber foreign by comparison to the patchwork aesthetic of the country’s capital. He almost missed the haphazard arrangement of Kreuzberg and Neukoelln, the miniature diasporas within each community. Eventually he came to a door, indistinguishable from all the others on the street except for a tall 23 painted above it.
A thin, wispy cloud of rain hung in the air, the nucleus of each drop surrounded by a ball of humidity. North German summer. He scanned the buzzers on the right hand side of the door looking for the name Schnatterer, but it wasn’t there. From top to bottom, the four buttons read:
W. Schneider
Theodor Hasse
Zimt/Kleeman
Watson
His eyes stumbled over the English name several times. He backed out of the doorway, looked up at the windows enclosed by brown parentheses. Finally, he stepped back in and pressed the fourth buzzer.
A moment passed in silence, then static hiss accompanied a distinctly male voice: “Ja, hallo?”
“Guten morgen,” Faber choked. “Ich suche… Frau Helga Schnatterer.”
He considered formulating a second sentence, but was interrupted. “Are you American?”
“Oh. No, I’m English. I…”
“Helga is my wife. What do you want?” The accent was mid-Atlantic, stern. For a moment, Faber imagined Thornton, decrepit with age, standing at the buzzer three stories above.
“I have some questions for Mrs. Schnatterer. About Charles Thornton.”
A sigh, then: “Come in.” The door hummed against its hinges, and Faber stepped truculently through.
* * *
He moved slowly along the cobbled street. The scrap of paper in his satchel bore an address printed in the Poet‘s neat handwriting, an address that Faber had been hoping to uncover since his arrival in Germany.
The small apartment was situated in the so-called Karoviertel of Hamburg and occupied the third floor of a large square cement building on Falkenstrasse. It was the last known residence of Helga Schnatterer, Thornton’s private secretary for nearly twenty years and the only living person to have spent any significant time with the ex-pat writer during his final years in Berlin.
A thin, wispy cloud of rain hung in the air, the nucleus of each drop surrounded by a ball of humidity. North German summer. He scanned the buzzers on the right hand side of the door looking for the name Schnatterer, but it wasn’t there. From top to bottom, the four buttons read:
W. Schneider
Theodor Hasse
Zimt/Kleeman
Watson
His eyes stumbled over the English name several times. He backed out of the doorway, looked up at the windows enclosed by brown parentheses. Finally, he stepped back in and pressed the fourth buzzer.
A moment passed in silence, then static hiss accompanied a distinctly male voice: “Ja, hallo?”
“Guten morgen,” Faber choked. “Ich suche… Frau Helga Schnatterer.”
He considered formulating a second sentence, but was interrupted. “Are you American?”
“Oh. No, I’m English. I…”
“Helga is my wife. What do you want?” The accent was mid-Atlantic, stern. For a moment, Faber imagined Thornton, decrepit with age, standing at the buzzer three stories above.
“I have some questions for Mrs. Schnatterer. About Charles Thornton.”
A sigh, then: “Come in.” The door hummed against its hinges, and Faber stepped truculently through.
* * *
The narrow hallway had given way to an apartment that, if not palatial, was at the very least prosperous. The Poet had told him that Thornton’s inheritance had been significant, and Faber wondered whether, unlike the Poet, Helga had been lucky enough to make it into Thornton’s will.
“Good morning, Mr….?”
“Faber.” The man was eying Faber cautiously.
“Mr. Faber,” he said. “I’m Lionel Watson, Helga’s husband.” He held out his hand and Faber completed the handshake. Watson was not as old as he had expected, though he did have powder-white hair that was strangely offset by deep, suntanned grooves in his forehead.
“Is Mrs. Schnatterer here?”
“She’s Mrs. Watson these days,” the man said. “And no, she’s at work.” Watson gestured Faber into the apartment, and offered him a seat on a sofa opposite the entrance. Watson reclined in a leather chair across from Faber and crossed one leg over the other. “So what do you want to know about the venerable Charles DeForest Thornton?”
Faber explained why he was in Germany, why he had felt that Helga might be the only connection left to Thornton and the only person who could shed some light on why the author had moved to Berlin in the late ’50s. When he finished, Watson chuckled and said: “Good Lord. You have an academic interested in Thornton?”
The sarcasm rang loud. “You think academics are interested in genre literature? I thought I was way off the beaten track with this little… search of mine.” He laughed awkwardly.
“Maybe in England. Here it’s de rigeur to write a master’s thesis on Charles’ books.” He leaned forward in the chair and a smile forced deeper grooves into his face. “I suppose I should explain. I’m a lecturer at the university here. Hamburg is an Americophile city, and they’re badly in need of washed up academics like myself to teach American Studies.”
Faber considered asking how he and Helga had met. The pairing did seem unlikely. “In any case, Helga might be an eyewitness, but I don’t think she will be of much help,” Watson continued. He rose and walked through into the kitchen, Faber trailing behind and trying to instill some confidence into his voice.
“She’s the best person to go to,” he said. Watson poured two glasses of water, placed one on the granite counter top and handed the other to his visitor.
“Maybe. But we’ve been married for nearly eight years and she’s mentioned Thornton a half dozen times at most.” Why did you marry her? Faber thought. The personal unknowns would, he supposed, have to remain unknown for now.
They parted having made dinner plans, Watson promising nothing more than an informal meeting with his wife under the pretense of her charming a visiting colleague over sushi and sake. Faber doubted that Helga would be any more forthcoming than she had been with her husband of eight years.
Exiting Falkenstrasse and walking in the direction of the Sternschanze train station, the air around him was lighter, the humidity having abated a little. Rain still soaked lifelessly into the pavements, while drops speckled each bicycle that Faber passed, their wheels or frames chained to lampposts or street signs. Pulling out an mp3 player, he unwound the earphones – picturing simultaneously the reels of magnetic tape that lay in his apartment back in Berlin – and plugged the buds into his ears. Scrolling through the Thornton recordings, he found the tape that he had last been listening to, labelled Apr. 94 and pressed play.
My dear Hans,
Firstly, and in response to your eruditely-composed English question: No. [A cough sputtered into the Dictaphone] I no longer think of any individual location, its inhabitants, topography, and cultural artifice, as home. Patriotism is at home neither in my bones nor in my heart. Neither, I believe (not that you asked), is it in Mr. Delaney’s character. In his latest excuse for an adventure, the intrigue comes in large part due to his surrounding himself with foreignness. The book will be set here in Berlin. (You and your promotional people will, I’m sure, be glad to hear this. The cultural translation will be so much easier).
Cars skated past Faber and the recording gave way to static. The gentle rush of rainfall against tyres complemented the hiss of dead air around Charles Thornton.
* * *
Watson and Helga stood as Faber reached their table. Helga was in her late fifties, but like so many German women she possessed the air of someone much younger. Her hair was carefully bobbed and dyed a deep red, her skin pale and flat. In many ways a negative image of Lionel Watson, though Faber.
She shook his hand, smiling and squinting her eyes as she did so. Her clothes were overly elegant, making Faber self-conscious in his plain black t-shirt.
As they sat, she said: “You are here to research with Lionel, yes?” The two men exchanged glances and Faber nodded.
“Yes, I’m a postgrad at Warwickshire University. I’m studying American literature, and Lionel -” he stumbled over the name. “Lionel offered his help.”
“What do you research?” Helga said.
“Well, my thesis work is on detective literature.” She stiffened a little, leaned back as a waitress placed a glass of sake in front of her. Faber had come this far. He took his chance and, while she was distracted, said: “on Charles Thornton, specifically.”
A pause fell across the room like a smothering pillow.
“Mr. Faber,” she said as the server withdrew. “Charles died eleven years ago, and though he did teach me some wonderful turns of phrase, and saw fit to pay me rather too much for my services as a secretary, I really have nothing more that I can give to the academic community or to his supposed estate in America that I haven’t already given.”
Faber nodded and tried to appear contrite. “I have no letters or manuscripts, no amazing revelations about his life in Berlin. I’m sorry.”
“But he was working on another novel, wasn’t he?”
“Look, Mr. Faber,” Watson interrupted. “Maybe this wasn’t such a good idea.”
Helga raised a hand. “Yes, he was. But I don’t have a copy of it. He only had one copy, and that had been sent to Lichttrager, his publisher, several weeks before he died.”
Faber knew that the publisher would never give him access to the manuscript. Helga was his only chance. “The last Ray Delaney novel, Mrs. Watson. Even a glimpse at it would help me more than you could imagine. Maybe a phone call from Helga Schnatterer would help to loosen Lichttrager’s filing cabinets?”
“A brand new turn of phrase.” Helga looked rueful. She asked: “How long are you going to be in Hamburg?”
[continues]
6.28.2010
Banana Cupcakes

If you're my Facebook friend (or real life friend, for that matter), you know that my mom and dad have gone into business baking and selling cupcakes at a couple of local farmers' markets (in Indiana, alas, or I would be getting in on that action). Anyway, seeing the gorgeous things they've been turning out has been really inspiring, so I thought I'd make a batch of cupcakes instead of a big cake for this month's cake feature.
While Dan and I were home earlier this month (picking up our puppy!),Wh my mom made some incredible banana cupcakes with peanut butter icing and I really wanted to have about six dozen of them while we were there. I did a little googling around and found that Martha Stewart has a banana cupcake recipe online, and isn't she supposed to be the authority on all things sweet and cute and cupcake-shaped? Dan isn't a big peanut butter fan, so I was thrilled to try out the suggested Honey-Cinnamon Frosting. So very delicious!
I don't have a great many photos of these things because I ate them far too quickly. I also attempted to make my own tulip cupcake cups, but that was only marginally successful. I suggest buying them, if you're into that sort of thing. Oh, also, I didn't change the recipe at all, except to add a little more vanilla extract, so just click on over and use Martha's instructions. They work like a charm.
Subscribe to:
Posts (Atom)

