5.28.2010

Standing By The Wall

In which the talented Mr. writes a brief story based on one of my photos.  This week’s story is taken from the diaries of Charles D. Thornton, American expat detective author living in Berlin.


I first met Albert ten years ago. His shop was on Oranienstrasse, a street which at that time was little more than a Turkish residential neighbourhood with the occasional bar full of artistically attired waifs. Bars that are now hip hangouts for the urbane urbanites of Berlin. You can’t argue with gentrification. Even in 1998, Oranienstrasse – the main vein running through the part of town that I live in – was a place that any guide book cautioned against.
Antique shop (Kenmare, Co. Kerry, Ireland)

5.27.2010

Great egg-spectations .... har har.

Most mornings I wake up with fuzzy eyes and a slightly aching head, both of which nasty symptoms disappear within about a half hour of my first cup of coffee.  Needless to say, I don't accomplish much in that first, oh, forty-five minutes of the day.  Some mornings, though, I wake up hungry but patient and a little inspired.
Such was the case on one of the early brilliant spring mornings a few weeks ago, when I woke with an appetite and an idea.  Last summer, on our anniversary, my sister made Dan and me a tortilla espanola - eggs gently hugging delicious potatoes with a little oniony bite.  While I was in Germany, all those many years ago, one of the reliably affordable and filling menu options on brunch and bar menus all over the place was a Bauernfrühstück - eggs scrambled with potatoes (Bratkartoffel) and, basically, whatever was handy.  And then there's the frittata I used to order when visiting my sister on Beacon Hill.

All of these things represent the egg dishes that are un-eggy enough that I can eat a lot of them without wanting to ralph.  (I have a thing about eggs.  You will not see me waxing poetic about the perfect poached egg and I will not be topping my bowl of greens with a fried egg, even though abstractly these ideas have a strong appeal.)

...

In fact, it occurs to me that I've only ever eaten a whole fried egg once - and that was in the service of a near-fatal crush on a cruelly imperceptive man-child.  Otherwise do you think I would have eaten this?  I shudder to remember it.

...

Anyway, this one morning I woke up with a craving for something a little heartier and more toothsome than the oatmeal to which I've become so accustomed.

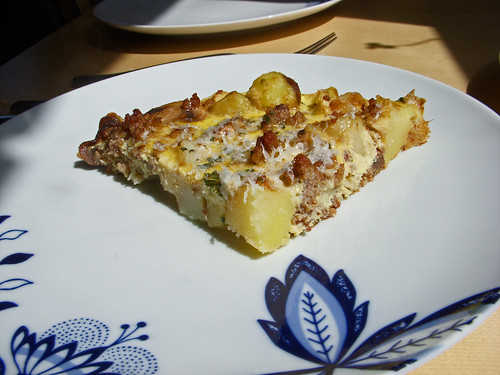
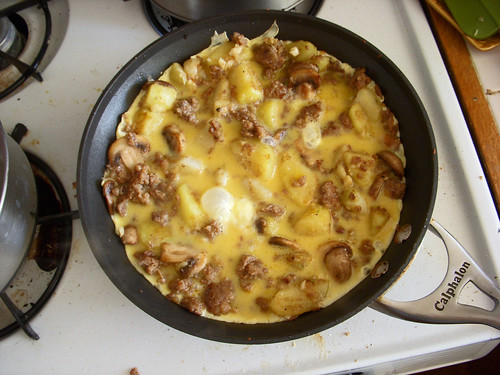
So I peeled some potatoes and cut them into chunks and set them to cooking.  When they were done, I threw some sausage (plain ol', ordinary ol' Jimmy Dean) into a pan with some roughly chopped garlic and let them go to town.  I then removed the sausage and garlic, leaving the fat in the pan.
Into the pan then went the potatoes (drained), some mushrooms (quartered), and some salt and pepper.  When those were all brown and beginning to crisp, I threw the sausage and garlic back in, then poured in three eggs beaten with a smidgen of milk.  I cooked that until the bottom was stable (i.e. I could slide it back and forth in the pan in one big chunk.), but the top was still liquidy, then I popped it into the oven at about 375 for about 15 minutes.
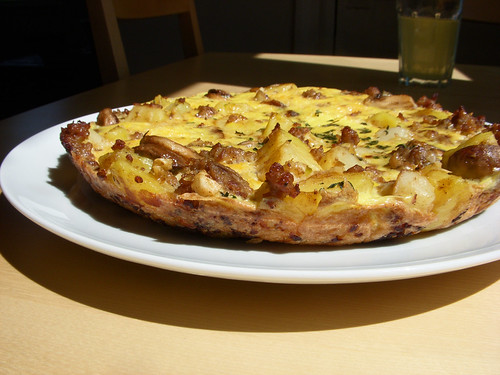
Once it was baked, I topped the whole thing with a heavy grating of parmesan and some roughly chopped thyme.

The eggs puffed up, the tastes all went together and the result was delicious.  The eggs bound all the other morsels together without tasting too much like eggs and the chunks of sausage and potato and mushroom solved the egg-texture-conundrum.  Sure, the end product of all this early-morning dithering wasn't really a frittata or a tortilla or a Bauernfrühstück, but it was damn tasty and I recommend you give it a try.
Obviously, if you like eggs, you should add a couple more.  And, you should throw in whatever's handy and tasty.  If you don't have mushrooms, don't use them.  Now that there are fresh veggies coming in, add those!  Asparagus would be delicious, as would peppers.  Basically anything.

So, you see, there's no real recipe this time around.  Consider this a mad-libs style recipe, maybe.

1. Cook potatoes.
2. Add [meat].
3. Add [something oniony/garlicky].
4. Add [any number of veggies].
5. Add [desired number of] eggs.
6. Top with [cheese].
7. Enjoy.

5.26.2010

If you'll permit me...

It's summer and the weather makes me feel disinclined to cook or write or do anything of use.  So today I'll give you a self-indulgent photo post.  These are from a trip I took with the Whole Family back in 2006.  We were on a cruise and spent a day in Barbados, which I found poetic.  Hope you enjoy.  Back soon with food.
Fig. 1. Ragged Point Light.

Fig. 2. Doorways and windows, Ragged Point Light.

Fig. 3. St. James Parish Church.

Fig. 4. Vegetation.
Fig. 5. Cemetery at St. James Parish Church.

Fig. 6. Harbor.
Fig. 7. Beach walking.

5.20.2010

Thanks to my colleagues ... Chocolate Custard Pie

As you may know, I'm a grad student at a large university in the Boston Area (names obscured to protect the innocent and guilty).  As such, my income comes from teaching an array of classes, some language classes, some literature classes.

This past semester I was the head teaching assistant for a very large class about Childhood Literature.  My responsibilities in this role involved wrangling the other five teaching assistants, making sure the professor leading the course had everything she needed (and that we needed!), teaching a couple discussion sections, and doing general admin work.  In short, this job came with major potential for ass-pain and irritation.  Going into the semester I had no idea what to expect.  Luckily, I managed to keep it together and keep our almost-200 students relatively happy (You'll be hearing more soon about how my fellow teachers and I threw a party for all of our students!), keep the other teachers mostly prepared and satisfied, and keep any major deadlines from slipping past us unnoticed (the ones that flew by were noticed, if not adhered to).

As much as I'd like to take all the credit, that would be dishonest at best and cruel at worst.  This post, you see, and the contents of it are meant as a tribute to the lovely teachers who made my semester so much nicer and more pleasant than it could have been with less willing and able help.

To thank these lovely ladies and one gentleman I invited them over for dinner a couple weeks ago.  Despite my purely last-minute preparation and pronounced indecisiveness about the menu, I pulled together a meal that I think was worthy of their good humor and help and we all passed a lovely evening together.

The Menu:
  • Simple Green Salad dressed with grated romano, olive oil, and good balsamic
  • Brie-stuffed, prociutto-wrapped chicken breasts
  • served with Asparagus Hash
  • Two desserts: 
  • Fresh strawberry shortcakes made with homemade buttermilk biscuits (pictured below)
  • Chocolate Custard Pie

It all turned out to be quite delicious (I will permit myself to brag about dinner) and the evening was filled with good gossip, hearty laughs, and a rather good time, I thought.

The most interesting part of the dinner prep was the pie.  It was a new recipe for me and that always gives me butterflies.  Moreover, I picked the recipe at the very last possible second, which left no margin for error.  Luckily, a few messy mistakes aside (I accidentally jiggled about a third of the filling out of the crust and into the bottom of my oven, causing a major cloud of chocolate scented smoke and a greasy black spot that I haven't yet dealt with), the pie emerged, gloriously caramelized, perfectly browned, and oh-so-custardy and all were satisfied.  The charming thing about this pie is that it separates into three beautiful layers while it bakes - a crispy caramelized chocolatey crust, a caramelly custard, and a flaky, tender crust.  It looks like WAY more work than it is in reality.  With no further ado, I give you the recipe.  Make this for someone you love (or appreciate, or owe a semester's worth of work to).  I think it would be delicious with some sort of berry sauce.  Or alone.  For breakfast.

Chocolate Custard Pie
adapted from cooks.com
  • 6 oz flour
  • 4 oz (1 stick) cold butter 
  • 2 oz (approx 3 T) ice water pinch salt
  • 2  oz bittersweet chocolate
  • 1/2 c (1 stick) unsalted butter, softened
  • 2 c brown sugar
  • 3 eggs
  • 1 1/2 t vanilla
  • 1/2 c whole milk
  1. Make crust: I used a very basic 3-2-1 pie crust.  
  2. Preheat oven to 350.
  3. Pulse the flour and salt together in a food processor, then add the butter, 1/2 T at a time.  Pulse until the mixture resembles meal.  
  4. Add water, 1 T at a time until the dough comes together into a rough mass.
  5. If you have a two-piece fluted tart pan, that will make things very easy - simply press the dough into the pan until it's roughly even, then use the bottom of a glass to smooth it out.  Place in fridge to chill.
  6. Meanwhile, make the filing: Melt chocolate in a heavy saucepan, the set aside to cool.
  7. In a medium bowl, with mixer on medium, cream butter and brown sugar until light and fluffy. 
  8. Add eggs one at a time, beating well after each addition. 
  9. Beat in vanilla, whole milk and melted chocolate.
  10. Pour into unbaked pie shell and bake about 50 minutes or until a knife inserted in center comes out clean.
(The original recipe suggests covering the whole thing with sweetened whipped cream and garnishing with chocolate shavings, but I really think the pie speaks for itself.  Of course, it's up to you.)

5.18.2010

Bourbon Tasting Goodies: Braided Chocolate Sweet Bread

Last weekend we were invited to a bourbon tasting at our friends Sam and Andrea's house.  We're in a bit of a bourbon phase - delicious stuff, that - so we were really excited to go.  When I asked Andrea (that's her below, with all those little cups of bourbon) what I should bring, she requested something bready and filling to sop up some of the four different bourbons we tried that night.  I had just read a new post over at Smitten Kitchen and the recipe sounded awfully delicious and filling, so I plunged in.

I won't lie - I had issues with this recipe. I'm blaming the first (failed) attempt on dead yeast. Seems likely, in my kitchen. I may have overshot on the do-over, but so far, so good. Deb's suggestion on avoiding a sticky situation was well-conceived and, after seeing how tender and sticky this dough is, I give her full credit for saving me a vale of tears spilt over a ruined masterpiece.

I'll note the changes I made to the recipe after the first failed attempt, so you know how to go with me or go with the original, whichever you prefer.  My version will be in [brackets].  The instructions are based on Smitten Kitchen's, but I've heavily tweaked them.
Braided Chocolate Sweet Bread  
Adapted from Smitten Kitchen, who adapted it from King Arthur

Sponge
  • 6 T (3 oz) warm water
  • 1 t sugar [2 t sugar]
  • 1 1/2 t instant yeast [after my yeast failed, I threw in a whole packet, so 2 1/4 t]
  • 1/4 cup (1 ounce) unbleached all-purpose flour
Dough
  • Sponge (above)
  • 6 T (3 oz) sour cream or yogurt [3 T sour cream AND 3 T plain, fat-free yogurt]
  • 1/4 c (4 T or 2 oz) unsalted butter, softened
  • 2 large eggs (beat one for the dough, reserve the other for brushing the dough)
  • 1/4 c (1 3/4 oz) sugar
  • 1 t salt
  • 1 1/2 t vanilla extract
  • 2 1/2 c (10 5/8 oz) unbleached all-purpose flour [plus up to 1/2 c more, depending on humidity]
  • [white sanding sugar for sprinkling]
Make Dough
  1. Make sponge: Whisk together flour, water, and sugar.  Add yeast and stir gently to combine.  Cover with plastic wrap and set in a warm place to proof for 15 minutes. 
  2. I made my dough in a stand mixer (*I'm told it can be done without! See below.): Beat together sour cream, yogurt, butter, egg, sugar, salt and vanilla until well blended.  
  3. Add the sponge and mix until well incorporated.  
  4. Add the flour 1/2 c at a time and mix with the paddle until the dough is rough, but the flour is incorporated.  
  5. Knead with the dough hook until a soft, smooth dough forms, about 5 minutes.  The dough should clear the sides of the bowl, but stick a little to the center of the bottom.  If your dough is too wet (i.e. doesn't clear the sides of the bowl, extremely sticky to the touch) add flour a couple of tablespoons at a time until the dough is cohesive.
  6. Place the kneaded dough in a lightly buttered bowl, cover with plastic wrap and set somewhere warm to rise for 90 minutes or until roughly doubled (or maybe a little less).
  7. While the dough rises, make the filling.
Sweet Cream Cheese & Chocolate filling
  • 2/3 c (5 oz) cream cheese, softened
  • 2 T(5/8 oz) sugar
  • 2 T (1 oz) sour cream
  • 1 t vanilla extract
  • 2 T (1/2 oz) unbleached all-purpose flour
  • 4 oz bittersweet chocolate
  1. Chop the chocolate finely and set aside (not someplace too warm - i.e. away from your oven).
  2. Combine cream cheese, sugar, sour cream, vanilla, and flour in a small bowl and mix until smooth.  For this to work, your cream cheese and sour cream should both be room temperature.  
  3. Set aside and check on your dough.
Assemble the beast
  1. Deflate the dough and roll it out on a generously floured counter to a 10″ x 15″ rectangle. Transfer rectangle to a large piece of parchment paper.  You may need help with this - have someone slide the parchment under the dough rectangle as you gingerly lift it.  If you don't have a spare set of hands around, I don't know why you couldn't just roll the thing out ON parchment.  
  2. Use a dough cutter or butter knife to mark two lines down the center of the dough, dividing it into three equal columns. Spread the cream cheese filling down the center section, leaving the top and bottom two inches free of filling. Sprinkle the chopped chocolate on top of the cream cheese filling.
  3.  To form the mock braid, cut horizontal strips (i.e. perpendicular to your filling) about an inch wide down the length of the outer columns of you dough (the parts without filling). Make sure you have an equal number of strips down the right and left sides. Use the dough scraper or butter knife to do this.  Don't cut the parchment paper.  
  4. To “braid”, begin by folding in the top and bottom strips, then folding the top flap down and bottom flap up over the filling. Lift the next dough strip and gently bring it diagonally across the filling. Be careful not to stretch the strips too much, as they will quickly become too thin and too long to do any good!  Repeat on the right side, and continue down the entire braid, alternating left and right strips until you are out. It should look roughly like a braid or a laced-up shoe.  
  5. Tuck any remaining ends under and call it a day.  It does not have to be perfect.  It will be impressive any way you do it.
  6. SLOWLY and carefully transfer the dough and the parchment paper to a baking sheet. Cover loosely with plastic and set it aside to rise for 45 minutes, until quite puffy.
  7. While the dough is rising, preheat the oven to 375°F. 
  8. After the rising is done, brush the loaf with egg wash, and sprinkle with sanding sugar. 
  9. Bake for 30-35 minutes, or until the loaf is golden brown. Depending on the depth of your oven, you may want to turn it midway through baking to ensure even browning. 
  10. Remove from the oven and cool for 15 to 20 minutes before serving.
*Make dough by hand: Whisk together sour cream, butter, egg, sugar and vanilla in a large, wide bowl. Stir in sponge. Add the flour and mix with a wooden spoon as best as you can; you may need to get your hands in there to form it into a shaggy ball. Turn ball of dough and any incorporated scraps onto a counter and knead until a smooth, soft dough forms, about 5 to 10 minutes. Place the kneaded dough in a lightly greased bowl, cover with plastic wrap, and allow to rise for 60 to 90 minutes, until quite puffy and nearly doubled.

5.15.2010

Things that are making me happy these days

Fig 1.  Strawberry season.  In this case, strawberries with piping hot oatmeal and brown sugar.

Fig 2.  Bright bright bright morning sun.

Back soon with many many new recipes.

5.10.2010

Freezer-clearing: Grape Sorbet

Last fall, as you know, I picked a bumper crop of Concord Grapes (with my friend Christine's help) from my back yard.  We made a big big batch of grape jelly out of about 1/3 of that crop and I stuck the rest of them in the freezer.  Last week, I started getting fed up with having the freezer full of grapes and so I decided to make some grape sorbet.

It turns out it was really really easy to do and the taste is sensational.  The intensity of the purple and the grapeyness of the flavor transported me back to when I was a kid and we would drive through at Lic's (the Diamond Avenue location) and I would get a Kiddie Cone with grape sherbert.  (Kiddie Cone meant they nestled a gummy worm on top - my favorite combination was grape sherbert and a green and yellow worm.)  Of course, it's no surprise that I like ice cream.

Anyway, this is something I'll be making repeatedly until my frozen grape stores are all used up and until new ones turn up in the fall.  If you have some grapes hanging around and don't know what to do with them, try this!

Concord Grape Sorbet
  • 1 1/2 lb concord grapes
  • 2/3 c simple syrup
  • 1/4 c water
  1. Make simple syrup: combine 1 c sugar and 1 c water in a medium saucepan.  Bring to a boil and boil until sugar is completely dissolved and liquid stays clear.  
  2. Place grapes (washed and stemmed) in a large saucepan with the water.
  3. Bring to a boil and cook until grapes burst and release their juices.
  4. Put the grapes through a food mill or a fine mesh sieve.  Discard solids.
  5. Stir in simple syrup and set mixture aside to cool completely.  If you want to accelerate this process (which I did) you can place the bowl of grape juice in an ice water bath.
  6. Once grape juice is completely cool, freeze according to instructions on your ice cream maker.
  7. IF YOU DON'T HAVE AN ICE CREAM MAKER, don't give up.  Freeze your juice in ice cube trays and then process it in a blender or food processor, then refreeze.  
  8. If your sorbet ends up too icy or solid, process it in a blender or food processor with a little milk or cream or almond milk, then refreeze.

5.07.2010

Public Service Announcement: Banana Soda Bread

I'm not much of a bread baker.  Not for lack of interest or desire, but because of an insurmountable laziness (I know the 5-minute books are meant to be great, but really?  Five minutes a day?).  It seems like I would have to really overcome inertia to get some starter started.  And I'm probably never going to get it together enough to get up in the morning and bake the bread I started the night before.  And otherwise it's pretty much an all day project, right?

It's only a matter of time, really, until I get over it and start kneading and proofing and all that goodness.  I mean, one of my first jobs was at an artisanal European-style bakery.  Alas, I was too young to work as a baker (I begged, but strictly no under-18s allowed), but I caught the bread bug.  Add to that the time I have spent in Germany, where the bread is really divine.  I know - French breads and Italian breads are also great, but the graininess and heartiness and heft of German breads speaks to me.

In the meantime, however, I'm all about quick breads.  I haven't blogged about it, but I love making banana bread and fully intend to make some zucchini bread this summer.  And you all know, of course, about the recent Soda Bread Phenomenon.

A couple weeks ago, I was about to whip up some soda bread when I caught a whiff of overripe bananas and thought, why not?  And so my bananas and my Soda Bread (or Sweet Amandine's Soda Bread, actually) got together and made sweet, sweet love in my oven.  The result was staggering.  Divine.  Moist, yet hefty.  Grainy and crunchy on the outside, but a little fruity on the inside.  Oh, and I don't know exactly why, (perhaps the extra moisture?), but this soda bread rose so much higher than my other efforts!  No more flat, tough soda bread for me!  Spectacular.  Try it, friends.

Banana Soda Bread
recipe verry loosely adapted from Sweet Amandine
  • 1 3/4 c all purpose flour
  • 2 c  whole wheat flour
  • 3 T instant oats
  • 3 T packed dark brown sugar
  • 1 t baking soda
  • 1 t salt
  • 1 t vanilla extract
  • 2 T (1/4 stick) chilled unsalted butter, cut into pieces
  • 2 c buttermilk
  • 2 bananas

  1. Preheat the oven to 425 degrees and butter a 9x5x3-inch loaf pan. 
  2. Combine the dry ingredients in a large bowl and whisk to mix well.
  3. In another bowl, mash the bananas (I like a potato masher for this job) and whisk together with vanilla and buttermilk. 
  4. Cut the butter into the dry ingredients, until the mixture resembles a fine meal. 
  5. Add the buttermilk/banana mixture to the dry ingredients, and stir to combine. 
  6. Squish the dough into the prepared loaf pan, and bake until the bread is golden brown, and a tester inserted into the center comes out clean. It should take between 35 and 40 minutes. 
  7. Slice, toast, and slather with butter to serve.

5.06.2010

The Green Door


In a new feature, we collaborate with Daniel Le Ray. I'll pick one of my photographs for the talented Mr. to be inspired by and to write on. 

The tectonic rumble of tracks against wheels complemented the music beating against Alice's eardrums. The sky was reddening a little, ready to break out into sunshine once the typical Berlin morning haze abated. But for now it was content, as was she, to accompany the familiar squeals and rolls of the tram coming to a halt just before the intersection ahead.


Happy Swirls: Cinnamon Rolls

Over Christmas last year, my mom made these amazing potato cinnamon rolls.  I ate something like five of them in a day.  They were light, cinnamon-y, and luxurious.

I mean, cinnamon rolls are one of my favorite things - you all know how I feel about spice in baked goods; I even like those Pillsbury cinnamon rolls (you know the ones that have an almost marbled-looking crust of cinnamon on top?), and walking through airports and malls where there's a Cinnabon booth is agonizing, even knowing that the taste isn't that great (there's always something a little chemically tasting, even if the smell is divine).  It's not a mild flirtation that I have with cinnamon rolls.
So, when Dan and I were invited to some lovely friends' house to have brunch on their porch and soak up some springtime sun, I was thrilled that they said, "we are decidedly not members of that class of people who self-satisfiedly declare that they simply have no appetite for sweet things in the morning."  I knew just what I was going to do.

But there was the small matter of a recipe.  I couldn't find one I liked!  I finally settled on this one, but you'll note it has VERY little cinnamon in it.  What's the point in that?  So what I did was step up the cinnamon a little (a lot).  I ended up with something that looked like this:
Potato Cinnamon Rolls

Dough:
  • 3/4 c sugar
  • 3/4 c hot mashed potatoes (about 2 potatoes)
  • 1-1/2 c warm water (110° to 115°)
  • 2 packages (1/4 ounce each) active dry yeast
  • 1/2 c butter, softened
  • 2 eggs
  • 2 t salt
  • 6-1/2 c all-purpose flour 
Filling:
  • 1-1/3 c packed brown sugar
  • 2 T ground cinnamon (increased from 1/2 teaspoon - bish plz)
  • 4 T butter, softened

  1. Make mashed potatoes.
  2. Mix together sugar and mashed potato, then add water and yeast.  Mix well. Cover and let rise in a warm place for 1 hour.
  3. Meanwhile, combine filling ingredients (except for butter) and set aside. 
  4. After the hour is up, stir potato mixture.  Beat in the butter, eggs and salt. Gradually stir in flour. Turn out onto a lightly floured surface; knead until smooth and elastic, about 5 minutes.
  5. Divide dough in half. On a floured surface, roll each portion into a 12" square. Spread half the softened butter (2 T) onto the surface of each dough square - don't be afraid of using your hands!  Sprinkle/spread the brown sugar/cinnamon mixture to within 1/2" of the edge. Roll up jelly-roll style, as tightly as possible. 
  6. Cut each roll into nine slices - I found a sharp knife and a sawing motion helped to preserve the swirl. 
  7. Place, slice side up, in a greased 9"x13" baking pan. Cover and let rise in a warm place until doubled in size, about 1 hour.
  8. Bake at 350° for 35-40 minutes or until golden brown. 
The recipe also thought it would be cute and say that icing is optional (hah!).  Here's what I came up with:

  • 1 c powdered sugar
  • 2 T butter melted
  • 1 1/2 T almond milk
  • 1 t vanilla
  1. Beat together powdered sugar, butter, and vanilla.  
  2. Add almond milk as needed to achieve desired texture for drizzling or spreading.  Remember that the icing will loosen up when it hits the hot rolls.

5.05.2010

May Cake: Christine's Birthday Cake

It's always nerve-wracking to meet the significant other of a close friend.  So many questions: Will I like her?  Will she like me?  How will this change my friendship with my close friend?  What on earth will happen if we don't get along?

It's very easy at times like these to jump to a variety of worst case scenarios, but in my experience, it all works out for the best. I've had a lot of meetings like these - introductions that made me shiver with anticipation and nerves.  When I met my friend Seth's girlfriend Christine, it was no surprise that I was nervous.  The good news is we got along!  I liked her, she liked me.

And then they moved to town and things changed again.  How would this change things?  We'd be seeing each other all the time.  What if we don't actually get along?  What if we were just playing nice before?

But the even better news is that Christine and I really get along!  With time, it just gets better!  Blah blah like fine wine blah blah.  Seriously, she's awesome and I really like hanging out with her.

So when the time came to celebrate Christine's birthday, I was bubbling over to help with the preparations.  I baked up a crazy delicious and rather amusing birthday cake. 

This time around I opted for a dark chocolate cake filled with homemade dulce de leche (I had a run-in with cake filled with dulce de leche at a wedding cake tasting a couple years ago and the memory of that first bite hasn't left me yet) and decorated with my mom's buttercream.  You see, while I was home a few weeks ago, I had my mom take me to the bizarre, but fabulous, cake-decorating shop in my hometown and help me outfit myself with some basic cake decorating tools (toys) and I couldn't wait to play with them.

The icing was tender and light, tasty enough to balance out the complexity of the dark chocolate and caramel of the interior.  Definitely a multi-layered flavor.

Should I cut to the chase?

It was a damn good cake.  Amusing, if not beautiful, and utterly delicious.

The Cake: Chocolate Mayonnaise Cake
from Nancie McDermott's incomparable Southern Cakes

  • 1/2 c cocoa
  • 1 c boiling water
  • 2 c flour
  • 1 c sugar
  • 2 t baking soda
  • 1/2 t salt
  • 1 c mayonnaise
  • 1 t vanilla

  1. Preheat the oven to 350.  Prepare two 9 inch cake pans (either with butter and flour or with Baker's Joy, which I've found failsafe of late - if you're going with butter and flour, also line the pans with greased parchment paper.).
  2. Mix the cocoa and boiling water in a large bowl and whisk well to combine.  Set aside to cool.
  3. Sift together dry ingredients.
  4. When the cocoa mixture is cool, add vanilla and mayonnaise and whisk well to combine (check for lumps!).  Add dry ingredients and beat until well blended and smooth.  Immediately divide batter into pans.
  5. Bake at 350 for 25-30 minutes until the edges start to pull back from the sides of the pans.  Cool completely in pans, then invert onto cake stand to assemble and decorate.

The Filling: Dulce de Leche
I used David Lebowitz's method for making dulce de leche, as I'm altogether too cowardly to boil a can of sweetened condensed milk.  Try it.  It's delicious.  Dangerously so.

The Icing: My Mom's Buttercream
  • 3 3/4 c powdered sugar
  • 1 c unsalted butter (softened)
  • 1 t vanilla (or more)
  • pinch salt
  • up to 1/4 c water (optional, if needed)

  1. Sift the powdered sugar.  Do it.  You'll regret it if you don't.
  2. Beat the butter until creamy.  Add powdered sugar and salt and beat until smooth and creamy.  
  3. Add vanilla and beat until smooth.  
  4. If it's still too stiff, add water by the teaspoon.

For piping buttercream, add more powdered sugar.  You want it to be very stiff.  Add color as desired and go crazy.